Ads 468x60px

Labels

Showing posts with label Mac OSX Tips. Show all posts

How To Use iOS & OS X Sharing & Highlighting Features For Special People In Your Life

os x sharingThe Apple ecosystem is not only about synchronizing data and using multiple Mac accounts, it also includes features and apps useful for those special people and VIPs in your life – people for whom you don't ignore their emails or phone calls, and for those you probably share photos with.

There are several iOS and OS X features and apps that you can use to highlight those special people in our life without needing to buy more apps or hardware. You can set up Mail notifications and ringtones, and share Photo Stream albums, Calendar dates, and Reminder lists, and even purchased apps with family members or a really close friend or two.

Special Ringtones & Text Tones

The default ringtone for the iPhone is called Marimba, which comes from the musical instrument of its name. But if you're new to the iPhone, you may not know that the iPhone includes two dozen other ringtones you can choose from to assign to special people on your Contact list. So for example, you could assign the Harp ringtone to your spouse or a relative, so you know specifically when he or she is calling you.

os x sharing

To assign a special ringtone, tap the Contacts button in the Phone app, select your contact's name, and then select the Edit button on the upper-right. Next, scroll down to the "ringtone" section and tap on it. From there you can preview different ringtones and assign one to your Contact.

os x highlight

Notice also you can do the same thing with Text message tones and vibrations. I actually use these special tones to ignore calls and text messages with the default sounds.

You can also roll your own ringtones using Garageband (Jeffry explains how here, or you can purchase ringtones via the iTunes app > More > Tones. I've made ringtones out of the favorite songs of my family members, so I'll definitely know when they are calling.

os x highlight

There are also iPhone apps that allow you to download free tones, such as Ringtones 500,000+ (free).

VIP Mail List & Rules

You can add special people to your VIP Mail list. This way, all the emails from that person will show up in a single folder. To add a contact to your VIP list on your iPhone, select the person's email message; then tap on their name in the From address field, and from there tap "Add to VIP."

os x highlight

Your VIPs will show up on all your Mac and iOS devices connected through your iCloud account. Likewise, to add a VIP to your list in the Mail application of Mountain Lion, select the contact's name in the From field of an email, and then move your cursor to the left side of their name. Select the Star icon that appears, which will add that email address to your VIP list.

Mail Rule For Special People

You can also use a Mail rule to highlight special people, which will cause the Mail icon in your Mac's dock to bounce up and down when you receive an email from a selected person or someone in a Group in your Contact list.

sharing on os x

To set this up, select a contact's email and then open the Preferences window for Mail. Next, click the "Rule" button, and then the "Add Rule" button. Type the person's name in the Description, and make sure their email address is in the "Any Recipient > contains" text field. You can also instead use "From" in the drop-down list of parameters.

Next, click on the "Move Message" button and select "Bounce Icon in Dock." Click OK, and whenever an email from your selected person arrives, this rule will activate.

Share Calendar Appointments

You can share calendar appointments with significant others. Say you schedule a dentist appoint for your child on your Calendar app. You can use the "Add invitees…" feature to share the calendar date with your spouse. This feature will send the invitee an email with the calendar date attached. When the invitee accepts the calendar date, it will be added to their supporting Calendar app.

sharing on os x

Share Reminders List

The Reminders app which is now included in both iOS 6 and Mountain Lion can also be used to share selected lists with others. However, setting up list sharing can only be done by logging into your iCloud account via a web browser.

After you log in, select the Reminders app on the home page.

sharing on os x

Next select or create a new list, and then hover your mouse to the right side of that highlighted list. Click on the Share icon that pops up and type in the email address of the person you want to share the list with. If the person's name is in your Contact list, their email should show up. After the recipient approves your list, whatever you add to that list will automatically show up in their Reminders app.

Share Apps

If you have apps that you purchased from the iTunes App Store or the Mac App Store that you to want to share with a family member, this can also be done. On the iOS device that you want to share apps to, launch the Settings app, and then tap on "iTunes & App Stores." From there tap on the Apple ID at the top. In the pop-up window, select Sign Out, and then sign back in using your account information.

os x sharing

Locate the app you've already purchased, and tap the "Install" button for that app. You will get a notice that you have already purchased the item. Click OK and download. After the downloads are made, the person should go back to the Settings app and sign back into their account.

The only caveat with this approach is that the person may need to sign into your account again for future updates of apps you've shared.

A few other sharing features you might be interested in include sharing your iOS and iPhoto photos via Photo Stream, and using the Find My Friends app for knowing where your family members are.

For other iOS and OS X related ideas, check out these articles :

Let us know what you think of these sharing and highlighting features on iOS and OS X devices. Are there any other ways you share with family and friends, or specifically recognize them on your devices? Share your tips.


QuickLock – A Free App That Locks Your Mac, Quickly

lock your macLock your Mac so you can get up and grab a coffee without fear of some prank derailing your day. QuickLock can be launched from a keyboard shortcut or the notification icon, and is a great way to keep annoyance or worse at bay.

In Windows you can press the Windows button and L to lock the screen. You can do this on a Mac, but only if you've set your computer to lock every time your screen or computer goes to sleep. Do you want to use the keyboard shortcut occasionally but don't want to type a password every time you wake up your machine? Too bad, Macs do not work that way.

Unless, that is, you install QuickLock. This simple app lets you lock your Mac's screen using a keyboard shortcut or a single click. You can even customize how your lockscreen looks, if you want.

Enter Lockdown Mode!

Like I said, the concept is simple. The lockscreen shows up when you use a keyboard shortcut. There's no password box, but you still need to type your password. When you do, everything will unlock.

lock your mac

Clicking the menubar locks the screen, but if you hold the control key while clicking it, you can access options. You can even set the program to lock the screen at a set time in the future, potentially making this useful for the Pomodoro technique:

lock your mac screen

You can customize basically everything about the lockscreen, if that's important to you. Custom background, custom lock icon; you can make things look almost however you like.

lock your mac screen

Whether this is worth doing is completely up to you, but it's nice to have the option. I added a picture of a shipwreck from northern Michigan:

lock your mac screen

Other settings include:

  • Dimming the display.
  • Opening the software when you start your computer.
  • Lock the screen at a set time, every day.
  • Your keyboard shortcut (set as whatever you like).
  • Your password (not necessarily the same as your system password).

So there are many ways in which you can tweak QuickLock to work exactly as you like.

Download QuickLock

Are you ready to give this a shot? Download QuickLockApp now. It's not in the Mac App Store, so get ready to do the drag-the-icon-to-the-Applications-folder dance.

Locking Without The App

Do you want to lock your Mac, but don't want to install a dedicated program for the task? There's a keyboard shortcut for turning the Mac display off – Control, Shift and Eject. For this to lock the screen, however, you'll need to set your computer to lock whenever the display turns off. Open up the Software Preferences, then click "Security". Check "Require Password" and you're set.

If you prefer locking from the menu bar that's also possible. Open KeyChain access (in Utilities), open the program's preferences and check the "add keychain status to menu bar" box. You'll now have a quick way to lock your screen from the menu bar:

lock your mac

QuickLock gives you a quick way to do both of these things, and allows you to customize your keyboard shortcut and the look of the lock screen. Even better, you can use it without the need to unlock your computer every time you start it. Which method you use is entirely up to you, of course.

Do you lock your Mac's screen when you leave the room? Why? Let us know in the comments below, along with your preferred method of locking.


9 Command Line Tricks for Mac OS X You Should Know

Command line tricks for OS X you should know

The command line is often considered the realm of advanced users, but that doesn't mean every usage of Terminal has to involve rocket science. This collection of terminal tips should apply to a wide variety of Mac users, and everyone from beginners to advanced users should find something worthwhile here.

Some of these tricks may require Xcode to be installed on the Mac, Xcode is a free download from the App Store.

Prevent Screen Savers and Sleep with "caffeinate"

New to OS X Mountain Lion, caffeinate is like a command line version of everyones favorite Caffeine utility. Usage is simple, with caffeinate running the Mac will not sleep, and screen savers will not activate. At it's simplest, it can be run alone, but it's probably best used with a time limit attached to it like so:

caffeinate -t 3600

The -t flag specifies the time in seconds, the example above runs caffeinate for an hour.

Extract PKG Files with "pkgutil"

Need to grab a file out of a .pkg file? Maybe you want to see what's inside of a pkg without installing it? No sweat, pkgutil does the job:

pkgutil --expand sample.pkg ~/Desktop/

This will dump the entire pkg contents into the specified directory, without installing it.

Use "purge" to Free Up Memory

The purge command forcibly flushes the disk and memory caches, having an effect similar to when you reboot a Mac. Though some say that purge only offers a placebo effect, it absolutely does work to send system memory from the "Inactive" category back to the freely available RAM, and in situations where you are running low on real memory, it can provide a speed boost.

Using purge is simple, type the following at a command prompt:

purge

Wait a minute or so for changes to take effect, the process is usually much faster on Macs with SSD drives.

Launch Multiple Instances of Apps with "open"

You may already know that you can open applications in the OS X GUI from the command line with the 'open' command, but did you know that you can run multiple instances of apps by attaching the -n flag to the open command? It's easy to use, here's all you have to do:

open -n /Applications/Safari.app/

The example runs another instance of Safari. Change the app name accordingly, and don't forget to include the .app extension.

Updating OS X without the App Store

Want to install system software and updates without bothering with the Mac App Store? You can do that directly from the command line instead with the help of the softwareupdate command. To install every update that is available, just run the following:

sudo softwareupdate -i -a

You can read more about softwareupdate command here, it has been bundled in OS X for years and works the same regardless of which version you're using.

List Everything You've Ever Downloaded

We've all been there; you downloaded something a while ago from a domain you sort of remember, but you can't quite remember what or from where. You're in luck, because Quarantine Services keeps a database of everything that has ever been downloaded, and you can query that database to find what you were looking for. Use the sqlite3 command as follows to see everything:

sqlite3 ~/Library/Preferences/com.apple.LaunchServices.QuarantineEventsV* 'select LSQuarantineDataURLString from LSQuarantineEvent' |more

Of course you can also delete that list if the existence bothers you.

Hide Files or Folders from Finder with "chflags"

Got a secret file or folder you want to keep hidden from the Finder? Use chflags to turn any file invisible from the OS X GUI file system, it works the same whether you're pointing it at a file or a directory:

chflags hidden /path/to/file/or/folder/

Lucky (or unlucky) for us command line folks, the file will still be visible with ls, but it will remain hidden in the Finder until the "nohidden" flag is attached like so:

chflags nohidden /path/to/unhide/

Changes are immediate in either event.

Automatically Type Long Paths with a Drag & Drop

Did you know you can drag and drop any file from the Finder into the command line and the entire path to that file will be automatically printed? This isn't exclusively a command line tip, but it's so useful that it has to be included. This is probably best used in conjunction with a command to prefix the path, like so:

sudo vi (drag file here to print the full path)

This works anywhere in the command line, even when you're already in an app.

Create a Password Protected Zip Archive

If you're sending a file through an unsecured medium or hosting it publicly, yet want to provide some level of protection, you can create a password protected zip archive with the -e flag:

zip -e protected.zip /file/to/protect/

Without the -e flag you'll just be creating a standard zip file without a password.


Create a New User Account on the Mac to Separate Work & Play

Create a new user account in Mac OS X

Creating a new user account and using that exclusively for work or play is an excellent way to increase your productivity by reducing distractions. This makes it very easy to use and carry just a single Mac to serve as both a work and personal computer, and can be a real lifesaver for those of us who are either workaholics or just easily distracted by all the stuff that resides on the computer.

The process below walks through how to create a new user account in Mac OS X, if you're already familiar with how to do that then skip through it and just take the general advice here:

  • Open System Preferences from the  Apple menu
  • Choose "Users & Groups" and click the lock icon in the corner to make changes, enter the password when requested
  • Click the [+] plus button to add a new user
  • Create a new user account in Mac OS X

  • Make the new account type Administrator or Standard depending on your security preferences, fill in the rest of the information then click "Create User"
  • Creating the new user account on Mac OS X

  • Now enable Fast User Switching by clicking on "Login Options" and checking the box next to "Show fast user switching menu", this lets you easily switch between accounts by pulling down a menu bar
  • Show Fast User Switching to quickly change user accounts

You're now ready to go with the new "work" account (or "play" account).

Get in the habit of only using this account for it's given purpose, and use Fast User Switching to switch back and forth between the work and play accounts when needed, though there's no harm in logging out of the other account either since OS X now can reopen your prior session with all of its windows and apps.

The new user account will have access to all the same apps as your primary account so long as they are stored in the primary /Applications/ folder, which is the default setting for anything installed in OS X be it from a DMG, PKG, or the App Store. If you want to go a step further, you can use Parental Controls to restrict app usage and prevent yourself from playing games, opening Facebook, and otherwise wasting your time with unproductive apps and websites. You can really get strict with yourself by creating standalone apps of websites you absolutely must access, then block everything else, but we're assuming you have more self control than that.

Thanks for the tip idea Ryan


Send & Share Contacts Easily from Mac OS X

Share Contacts easily from Mac OS X app

The Contacts app in OS X makes sharing the contact information of anyone in your address book extremely simple, and if you have iCloud enabled you can share any address from your phone right from your Mac, without reaching for the iPhone itself:

  • Open Contacts in OS X and choose the contact you want to share
  • Click the [>] Arrow button in the lower portion of Contacts to access sharing options, choose Message, Email, or AirDrop
  • Include a message alongside the contact if desired, then choose "Send"

The files being sent out are vcard formatted, meaning just about anything will be able to read the information, whether it's another Mac, iPhone, Windows PC, Android, Blackberry, or whatever.

Share a contact from OS X Contacts app

Everything will be handled right through Contacts, unless you have Gmail or webmail configured as your default Mail client in OS X and choose the Email option, which will upload the vcard to the appropriate webmail client instead.

If you choose the iMessage feature and the recipient has iMessage configured with their Mac, iPhone, or iOS device properly, they'll be able to immediately import the contact right into their Contacts list in iOS just by tapping on it, just like sharing Contacts between iPhones.

Using the email option and sending the vcard to yourself can also be a way of preserving an individual contact that you'll otherwise be deleting from your contacts list, forming a one-off backup for that individual, though if you're looking to backup an entire address book there are better ways to do that in bulk.

8 Mac OS X Annoyances (Yes, They Exist!) Resolved

mac os x annoyancesMac OS X computers are the very model of simplicity and usability.When you plug one in and try to do something, it just works. There's no need to mess around with anything. Everything is in it's right place and works just as you would expect it to. Except when it doesn't just work. Yes, you heard that right. Mac computers come with those little quirks, those small Mac OS X annoyances, just like every other operating systems.

Whether the features introduced in Mac OS X Lion have you on edge, or you recently switched from Windows, sometimes you won't find a setting where you'd expect it—or worse, you may not find it at all. Below are some of these issues, completely resolved!

1. Finding Downloaded Files

If you're unable to find your downloaded files, open Finder and select the Go menu from your menu bar. Right away, you'll see a shortcut to the Downloads folder. However, we can also put a shortcut in the sidebar of Finder for easier access. Select Go -> Home, and drag the Downloads folder onto the favorites section of your Finder sidebar.

mac os x annoyances

You may want your Downloads to be accessible through your Documents or Desktop folder. Rather than changing the default download location in every single web browser and download client, just create an alias (like a Windows shortcut) to your Downloads folder in these locations. Hold the option (alt) and cmd keys while dragging the Downloads folder to another location to create an alias.

2. Disable Autoloading Applications

Are you annoyed by an application starting unprompted at computer launch? (Skype, I'm looking at you). Open System Preferences and go to the Users & Groups preferences pane. Select your account from the left hand side column, and go to Login Items. Listed here are all the applications that are set to start  when you log in to your computer.

os x annoyances

There are two ways to deal with annoying applications in this list. Tick off the checkbox in the first column to start these applications hidden from view. This is an option for an often used application you nevertheless don't want bloating your desktop at launch. Alternative, delete an application from this list to keep it from starting unprompted.

3. Files Opening In The Wrong Application

Are your files not opening in your application of choice by default? There are two ways to fix that. First, right-click (or CTRL-click) a file of the right file type and select Open With -> Other. A Finder dialog will pop up, allowing you to select an application to open the file with. At the bottom of the dialog, tick off the checkbox "always open with" to use the selected application as the default choice for the file type.

os x annoyances

Alternatively, right-click (or CTRL-click) the file and select Get Info, or press the CMD + i keys to launch the info pane shown in the screenshot above. Here, too, you can select the application to open this type of file. Press the Change All button below to apply the changes to all similar files.

4. Not Enough Screen Real-Estate

Not enough room for all your applications? Your workflow feeling a bit cramped? Mac OS X comes with built-in support for multiple desktops, but it's a feature that can be a bit hard to find on your own. You can view the open spaces in Mission Control, which can be opened by using three fingers to slide upward using the multi-touch interface, or by pressing option (alt) and the upwards arrow on your d-pad.

os x annoyances

You can add a new single-application space by clicking the arrows icon in the top right corner of a supporting application. This opens the application full-screen in a space separate from your desktop.

To create more than one desktop (as in the screenshot above), open Mission Control and hover your mouse over the top right corner of the screen. Click the faded desktop icon that appears to create a new desktop space. Drag windows across different spaces by dragging them against screen borders, or using drag-and-drop in mission control.

5. Tap-To-Click & Reversed Scrolling

The biggest annoyance of any Windows user that tries to use my laptop is either the missing tap-to-click interface, or the reversed scrolling. Luckily, both can be adjusted in the preferences.

To enable tap-to-click, open System Preferences and go to the Trackpad preferences pane. In the first tab, Point & Click, toggle the first checkbox to enable or disable clicking by tapping the trackpad with one finger, as it works in more recent Windows versions.

Dragging with two fingers over your trackpad either scrolls by dragging the page with you – also called natural scrolling – or by dragging the scroll bar with you. You can toggle natural (a.k.a. reversed) scrolling in the second tab, Scroll & Zoom.

6. Auto Brightness Adjustments

Mac OS X uses your webcam to sample the lighting of the room you're in and automatically adjust the brightness of your screen. Although this is one of my favorite features, I can imagine it being annoying if you've got inconsistent lighting.

os x annoying

To turn off the automatic brightness adjustments, open System Preferences and go to the Displays preferences pane. Select your computer screen and, under the Display tab, toggle the box below the brightness slider.

7. Applications Resuming After Restart

Some apps are able to resume their application state after being quit and reopened. This can be quite annoying if you want quit the application every once in a while to wipe the slate clean.

os x annoying

You can circumvent the application resume by quitting it a different way. Open the application's drop-down menu, and hold the option (alt) key. The lowermost option will change from a standard Quit to "Quit and Close All Windows".

8. System Resuming After Restart

Recent iterations of Mac OS X come with the ability to restore the state of your system after restarting your computer (or after a crash). This includes opening the same files and applications. Similar to the above, this can be annoying if you restarted your computer to clean up your overly populated desktop and free some memory.

mac os x annoyances

Using the Apple drop-down menu, select Restart. You can toggle off the checkbox next to "Reopen windows when logging back in" if you want a clean restart. Just don't forget to re-enable it if you want to take advantage of the resuming capabilities of Mac OS X under normal circumstances.

What are your main Mac OS X annoyances, and what did you do to solve it? Let us know in the comments section below the article!

Image credit: David Castillo Dominici / FreeDigitalPhotos.net


Apple Seeds Third iOS 6.1 Beta to Developers

Apple today released the third beta of iOS 6.1 to developers. The release has a build number of 10B5117b, versus 10B5105c for the second beta of iOS 6.1 that was released on November 12.

Screen Shot 2012 12 03 at 12 20 19 PM
As with previous betas, Apple mentions a number of changes from iOS 6.0.1, including several related to how developers can integrate Apple's new mapping service in their apps, as well as an improvement to how boarding passes are handled in Passbook, and a few minor changes to Safari.

Apple also released a beta of the Apple TV software, as well as Xcode 4.6 Developer Preview 3. Registered developers can download the betas via Apple's Developer page or via Software Update on iOS devices with a previous iOS 6.1 Beta already installed.

Three Ways To Tweak Hidden Settings In OS X

hidden settings mac os xMac OS X and user-friendliness are two subjects not shy of each other's company. In general, using a Mac OS X computer feels intuitive, natural; everything feels the way you expect, and your screen real-estate isn't wasted on unwanted meta-features and overly bloated interfaces. This allows you to focus on the important things.

When you don't want your computer to work as it would out of the box, you can start playing with the system preferences. This allows you to tweak the settings to adapt your computer to your specific way of use—you make it fit in your office habitat.

It's only when these tweaks are especially specific and low-level—changing the intrinsic behaviour of your operating system and interface components, like the Finder behaviour and Spotlight indexing—you may not find a resolution in the system settings. That doesn't mean there's no solution, though. Using the command line, or one of several third-party tools, you can tweak hidden settings in Mac OS X. We'll go over these below, in growing order of complexity.

1. Mountain Tweaks + Lion Tweaks

If you're using Mac OS X Lion (10.7) or Mountain Lion (10.8), you should take a look at Lion Tweaks and Mountain Tweaks, respectively. These apps provide a more user-friendly way of tweaking your operating system—an easy graphical user interface, rather than using Google and Terminal. Use the app to revert to a 2D-Dock, show the use library folder, disable GateKeeper, remove the new leather interface in the Calendar application, and more.

hidden settings mac os x

Mountain Tweak shows three tabs. The first tab—General Tweaks—shows tweaks that can be applied to both Mac OS X Lion and Mountain Lion. The next two tabs outline Lion Tweaks and Mountain Lion Tweaks, respectively. The developer warns that although most Lion Tweaks will work properly on Mountain Lion, the reverse is not true.

One problem with these apps is that it doesn't keep track of the tweaks you apply. This may be trivial in some cases, but may require you to do the accounting in more complicated scenarios. That said, if anything goes wrong you can always go to Restore (the fourth tab), which helps you revert any applied tweaks and restore your computer to it's original state.

For a full review, and a more complete overview of the available tweaks, take a look at Tim Brookes' article on Lion Tweaks and Mountain Lion Tweaks.

2. Deeper

A more advanced and in-depth application comes courtesy of Titanium's Software; the same team developing Onyx. Deeper is one of the best applications to tweak obscure operating system settings of the Finder, Dock, Safari, Spotlight, and more; the specifics of course depend on your operating system version.

hidden settings mac

Among other things, you can enable the animated desktop, make your version of iTunes less store-reliant, change the specifics of the Finder File menu, and (as in Mountain Tweaks and Lion Tweaks) toggle the 2D dock to improve overall desktop performance.

At the time of writing, you can download Deeper for Mac OS X Lion, Mountain Lion, and a number of older operating system iterations. Check to make sure you're downloading a version of the application corresponding to your operating system. For more information, and a better overview of the available tweaks, check out last year's article on Deeper from Bakari Chavanu.

3. Secrets

The two applications mentioned above both provide an easy way to tweak obscure operating system settings. Most of the time, they provide an interface to low-level settings that are reachable through the command line. Maybe you see where we're going—instead of using one of the aforementioned applications, you can tweak the same (and more) settings using the Terminal. Mind you, if you don't know what you're doing, this is not the place to learn.

hidden settings mac os x

On the other hand, if you're not afraid to get your hands dirty, a great place to pick up those obscure operating system commands is at Secrets—a self-proclaimed database of hidden settings for Mac OS X. Browse through the commands to find new gems, or search for something specific. There are sure to be some interesting Terminal commands you don't already know.

Have you ever tweaked hidden settings in Mac OS X? What did you (try to) achieve? Let us know in the comments section below the article!


iFixit iMac teardown reveals dual mics, difficult ram upgrades & glued on LCD

21.5 iMac teardown late 2012

While we had some pictures of a brief teardown earlier this week, iFixit has now completed its ritual teardown of the new 21.5″ iMac that officially went on sale on Friday.

Unfortunately iFixit described the process as an "exercise in disappointment," noting the iMac's new thinner design introduces new hurdles for repairability. Most notably, the device's glass and LCD are now glued directly to the iMac's frame, while accessing the RAM, CPU, and hard drive will now mean having to remove the entire logic board:

The late 2012 iMac 21.5″ — code-named EMC 2544 — is an exercise in disappointment for us. We were quite worried when we saw that super-thin bezel during Apple's keynote, and unfortunately we were correct: the glass and LCD are now glued to the iMac's frame with incredibly strong adhesive. Gone are the lovely magnets that held the glass in place in iMacs of yesteryear.

A few things noted in iFixit's highlights: a new rubber housing that "dampens the vibrations from the spinning hard drive," a new fan layout, dual microphones, and an LG made display. Those are some of the highlights of Apple's new design, but iFixit is scoring the new iMac a 3 out of 10 (down from 7 last year) due to the many issues with repairability. Here are just a few:

* Intel Core i5-3330S, clocked at 2.7 GHz
* Nvidia GeForce GT 640M GPU
* Intel E213B384 platform controller hub
* Texas Instruments Stellaris LM4FS1AH5bb microcontroller
* 2x Hynix H5GQ2H24AFR GDDR5 SGRAM
* Broadcom BCM57765A1KMLG
* Intel DSL3510L Thunderbolt controller
* Analog Devices SSM3302 audio amplifier
* Vimicro VC0359 webcam processor
* Intersil ISL6364 multi-phase pulse width modulation (PWM) controller
* Cirrus Logic 4206BCNZ audio controller
* National Semiconductor VM22AC

* To our dismay, we must break out our trusty heat gun and guitar picks to get past the adhesive holding down the glass and LCD.

* We were fairly surprised to see that the new iMac's LCD sports the same model number as last year — LM215WF3 from LG — even though the LCD is 5 mm thinner.

* By switching from a traditional 3.5″ desktop hard drive to a 2.5″ laptop drive, Apple designers were able to free up lot of real estate inside the iMac. Apple turned to HGST — formerly Hitachi, now a Western Digital company — to manage the iMac's spinning storage.

* A rubbery housing is lightly adhered to the edges of the hard drive beneath the upper and lower hard plastic bezels. This design is far different from what we've seen before. Since the internal components are more tightly packed than before, small vibrations may carry through more components. The rubber housing dampens the vibrations from the spinning hard drive so they are not perpetuated throughout the device.

* A new fan layout! Apple is changing things up quite a bit and has moved from multiple small fans to a single centralized fan. "1″ may be the loneliest number, but removing 2/3 of the fans goes a long way towards saving space. Judging by the orientation of the fan, we gather that it draws cool air from the bottom vents, then blows hot air out of the grating in the back of the iMac.

* The webcams in iMacs of yesteryear have always been connected to the logic board with long snaking cables that were relatively fragile; that is no longer the case. A ribbon cable we can only describe as "beefy" keeps the FaceTime HD camera in touch with the logic board.

* The newest iMac features not one, but two microphones. Dual microphone technology has been utilized in mobile devices for years to cut out background noise during phone calls. Now, the same idea is being applied here to improve sound quality during intimate FaceTime chats with your mother.

* The speakers may look simple, but removing them is nerve-wracking. For seemingly no reason other than to push our buttons, Apple has added a notch to the bottom of the speaker assemblies that makes them harder-than-necessary to remove.

* Good news: You can upgrade the iMac's RAM. Bad news: You have to unglue your screen and remove the logic board in order to do so. This is just barely less-terrible than having soldered RAM that's completely non-removable.

* After a short hiatus, Broadcom is back to bring WLAN capabilities to the iMac. A Broadcom BCM4331 single-chip WLAN solution dominates the tiny AirPort card.

* Off comes the honkin' heat sink! And along with it — the CPU??? The new iMac uses a spring-loaded, FCLGA1155 socket to make all those little electrical signals go into, and out of, the CPU: http://bit.ly/QUCPG6

* These logic board traces (red) and hole (orange) make us think Apple's proprietary SSD should reside in this spot:http://bit.ly/VeAeEs Placing the SSD from the 13″ MacBook Pro Retina Display confirms this notion: http://bit.ly/YhEmJuWe purchased the "bargain-basement" version of the iMac. We're assuming that the more-expensive version — one that has the built-to-order Fusion drive option — has this connector soldered onto the board, and a 128GB SSD is placed into said connector.


Resolving Stubborn Wi-Fi Connection Problems in Mac OS X

Fixing Wi-Fi problems in Mac OS X

A fair amount of Mac users have encountered long lasting Wi-Fi connection issues, whether it's a dropping connection, a refusal to reconnect after waking from sleep, or any other number of oddities pertaining to wireless networking. Often these connection problems can be resolved with renewing a DHCP lease and changing the MTU size, but sometimes things are more stubborn and a wireless connection will continue to drop or throw unusual connection errors when waking from sleep. If you find yourself struggling with persistent wifi problems, try deleting all preference plist files associated with wireless settings in OS X:

Fix Stubborn Wi-Fi Problems by Deleting Preference Files

Before beginning, be sure to have the wi-fi password of your primary network handy. You will need it to rejoin the network.

  • Pull down the Wi-Fi menu and turn Wi-FI OFF
  • Turn Wi-F off in OS X

  • From any Finder window, hit Command+Shift+G to bring up Go To Folder, and enter the following path:
  • /Library/Preferences/SystemConfiguration/
    Going to the Wi-Fi preferences folder

  • Locate the following files, copy them to the desktop for a backup, then delete them from the /SystemConfiguration/ folder:
  • com.apple.airport.preferences.plist
    com.apple.network.identification.plist
    NetworkInterfaces.plist
    preferences.plist

    Remove Wi-Fi preference files in Mac OS X to resolve connection problems

  • Empty the Trash and reboot the Mac
  • Turn Wi-Fi back ON from the Wi-Fi menu, join your preferred network as usual

This process forces OS X to create all new preference files for wireless networking, which can be an effective troubleshooting strategy if the wi-fi problems began after upgrading versions of Mac OS X and even installing incremental system updates.

The wi-fi connection should now work as expected unless there's a deeper problem, whether it's a compatibility issue with the router (often resolved by this DHCP and MTU fix), a problem the router itself, or something as simple as network interference (here's how to check connection strength and interference issues), which can often be resolved by reconfiguring a routers physical arrangement or changing it's broadcast channel.

Let us know if this worked for you, or if you have any other helpful wifi problem.


Add a File Extension to a Group of Files from the Command Line in OS X


Add file extension to a group of files in Mac OS X
The quickest way to add a file extension to a group of files that don’t currently have one is by using the command line in Mac OS X. In the example below, we’ll add a “.txt” extension to all files in a single directory, but subbing .txt in the command string will add a different extension instead. Before beginning, it’s a good idea to do the following:
  • Be sure to have file extensions visible on all files in OS X, that way the extension change will be visible in the Finder in addition to the command line
  • Place all files that need the extension added into a single and separate directory
Next, launch Terminal (found in /Applications/Utilities/) and do the following:
  • Change to the directory containing the files by typing:
  • cd /path/to/directory
  • Once inside the directory, use the following command:
  • for i in *; do mv "$i" "$i.txt"; done
  • Confirm the change by typing “ls” to list the directory contents
You can also drag and drop a directory from the Finder into the terminal window to print out it’s path, rather than manually entering it.
Below is a complete example showing a change to the directory, listing the original contents, executing the appropriate command to add the extension, and finally another listing showing the original files with the new .txt extension added.
$ mkdir ~/Desktop/FilesThatNeedExtensionsAdded/
$ mv tes* ~/Desktop/FilesThatNeedExtensionsAdded/
$ cd ~/Desktop/FilesThatNeedExtensionsAdded/
$ ls
test test1 test2 test3 test4
$ for i in *; do mv “$i” “$i.txt”; done
$ ls
test.txt test1.txt test2.txt test3.txt test4.txt
As mentioned before, to add a different file extension just replace the “.txt” with something else, like “.jpg” or “.rtf”. The wildcards can also be adjusted to match file name commonalities.
Thanks to Thom for the tip idea

Subscribe to OSXDaily Subscribe to RSS Subscribe to Twitter Feed Follow on Facebook Subscribe to eMail Updates Shared on Facebook Shop at Amazon Ad Borderlands 2 25% off Today Only First-person shooter with RPG elements. OSXDaily on Facebook OSXDaily on Google+ Search OS X Mountain Lion Encrypt Time Machine Backups with OS X Sep 26, 2012 - Leave a Comment Encrypt Time Machine backups in Mac OS X Time Machine backups can be encrypted right from your Mac. This means the data is extremely safe from prying eyes and the very unlikely event of a cracking attempt, and it also means you’ll need a password to access the encrypted backups yourself. Enabling this feature can be done in two ways: Enable Encryption on New Time Machine Drives If you’re setting up a new Time Machine backup drive, enabling encryption is extremely easy: Connect the drive to the Mac, when asked to use the drive for Time Machine, check the box for “Encrypt Backups” Encrypt Existing Time Machine Backups Already using Time Machine? Enabling encryption is just as simple. With the Time Machine drive connected to the Mac: Open System Preferences from the  Apple menu and choose “Time Machine” Choose “Options”, select the drive to protect, and choose “Encrypt backup disk” or “Encrypt Backups” The wording varies slightly depending on which version of OS X you’re using. You will need OS X Lion 10.7.4 or OS X Mountain Lion 10.8 or newer to have the backup encryption option available, though the ability to encrypt existing drives only comes with Mountain Lion onward. Certain folders can be excluded from backups if they don’t need to be encrypted, but because they won’t be backed up you’ll need to handle backups of those files manually. For those who don’t need to encrypt all backed up data, another excellent option is to encrypt folders with password-protected Disk Images. That disk image file can then be backed up as usual to a Time Machine drive, but only the data stored inside of it will be protected instead. Comments: none Set Up Facebook Integration on your Mac with OS X Mountain Lion Sep 25, 2012 - 9 Comments Set Up Facebook in Mac OS X Facebook can now be integrated directly into Mac OS X. All you need is OS X 10.8.2 (or later) and a minute or so to get it configured. Once Facebook is setup in OS X, you’ll be able to post status updates from Notification Center, post directly to Facebook from Share Sheets, find your Facebook friends in Contacts, and even see a list of all Facebook notifications right in Notification Center. Open System Preferences from the  Apple menu Click on “Mail, Contacts & Calendars” Locate “Facebook from the list and click on it Add your Facebook username and password, then click “Next” and configure as necessary If you want to make further adjustments to how Facebook interacts with Notification Center, just open the Notifications panel inside System Preferences, find Facebook, and configure alert styles, the amount of items shown, and the type of Notifications to receive. You can also determine whether or not the status updater appears in Notification Center. Share to Facebook from Mac OS X Now that Mac OS X has been configured with Facebook, you won’t need to login again when sharing items from the web or from your Mac or posting statuses from Notification Center. Facebook can be fairly distracting, so if you get tired of notifications just temporarily turn them off to give yourself some quiet time to focus. While we’re on the topic of Facebook, don’t forget to Like OSXDaily and follow us there too! Comments: 9 Stop “Save As” From Changing Original File in OS X Mountain Lion


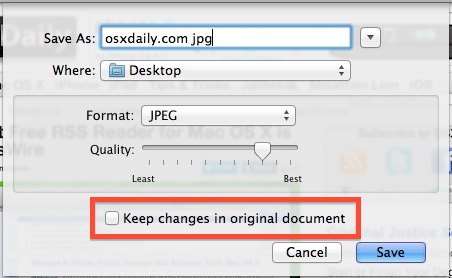
“Save As” is back in OS X Mountain Lion, but many users have complained of how it modifies the original file in addition to the newly saved file, thereby defeating the purpose of how many people use Save As. If this bothers you, you’ll be pleased to discover that from OS X 10.8.2 onward, there is now an easy option to toggle that prevents Save As from altering the original file when it’s called.

Stop Save As changing original file in OS X
  • Open a file and choose “Save As” as usual
  • At the Save dialog window, uncheck the box for “Keep changes in original document”
  • Save as usual
As long as that checkbox is not active, the original file will not be modified.
Though there isn’t a system-wide adjustment to control this behavior in all apps, you do only have to uncheck it once per application. In other words, if you uncheck it in Preview for one file, it will be automatically disabled for every other file opened in Preview app, unless it is checked again of course.

Encrypt Time Machine Backups with OS X


Encrypt Time Machine backups in Mac OS X
Time Machine backups can be encrypted right from your Mac. This means the data is extremely safe from prying eyes and the very unlikely event of a cracking attempt, and it also means you’ll need a password to access the encrypted backups yourself. Enabling this feature can be done in two ways:

Enable Encryption on New Time Machine Drives

If you’re setting up a new Time Machine backup drive, enabling encryption is extremely easy:
  • Connect the drive to the Mac, when asked to use the drive for Time Machine, check the box for “Encrypt Backups”

Encrypt Existing Time Machine Backups

Already using Time Machine? Enabling encryption is just as simple. With the Time Machine drive connected to the Mac:
  • Open System Preferences from the  Apple menu and choose “Time Machine”
  • Choose “Options”, select the drive to protect, and choose “Encrypt backup disk” or “Encrypt Backups”
The wording varies slightly depending on which version of OS X you’re using.
You will need OS X Lion 10.7.4 or OS X Mountain Lion 10.8 or newer to have the backup encryption option available, though the ability to encrypt existing drives only comes with Mountain Lion onward.
Certain folders can be excluded from backups if they don’t need to be encrypted, but because they won’t be backed up you’ll need to handle backups of those files manually.
For those who don’t need to encrypt all backed up data, another excellent option is to encrypt folders with password-protected Disk Images. That disk image file can then be backed up as usual to a Time Machine drive, but only the data stored inside of it will be protected instead.

3 Ways To Manage Display Settings In Mac OS X Mountain Lion


display settings mountain lionWith Mac OS X Mountain Lion, Apple introduced a number of changes; some small, some big. One of those tiny changes that impacted my workflow most is the disappearance of the menu bar display menu.
Before the update, ticking off a checkbox in the Mac OS X display preferences pane would introduce a nifty display icon in the menu bar at the top of your screen. Using that icon, you could toggle between different display resolutions with a mouse click or two. If you’re in the habit of using different external displays or beamers during your work, that’s a priceless little tool.
That menu bar icon is now gone. In this article, we’re going to look at three different ways to easily change and manage display settings on the fly.

1. Use The Keyboard Shortcuts

The most straightforward solution would be to navigate to and through the System Preferences to the Display preferences pane. By selecting the ‘scaled‘ resolution option, as opposed to ‘best for built-in display‘, you’ll be able to select a different resolution manually. Hold the option (alt) key to show the Detect Displays button.
display settings mountain lion
Rather than taking the long route through the System Preferences, hold the option (alt) key on your keyboard and press one of the brightness adjustment keys to open the Display preferences pane straightaway.

2. Display Menu

Using the keyboard shortcut described above helps a lot to speed up your workflow, but if you’d like something more akin to the menu bar icon of old (and are not averse to installing third-party software), you should take a look at Display Menu, which is available in the App Store for free.

mountain lion external display settings
Once installed, you’ll see a display icon in your Mac OS X menu bar. Clicking it will allow you to manually select an alternative resolution for any of the currently connected displays (all in a separate sub-menu). Adding to this, there’s a Mirror Displays option that lets you show the same content on all the connected displays, instead of extending your desktop across display borders.
At the time of writing, Display Menu does not support the two small display modes of the retina MacBook pro. If you’re using a computer with retina display, check out QuickRes below.

3. QuickRes

QuickRes is another application aimed at adding display resolution options to your Mac’s menu bar. Part of the functionality overlaps with Display Menu (discussed above). That is, QuickRes also lets you select a screen resolution on the fly by right-clicking the display icon.
display settings mountain lion
However, you can also choose anything from two to eight preferred display resolutions in the application preferences. Left clicking the display icon then toggles through these presets in order while showing a notification of the new resolution on your computer screen. Specifying a keyboard shortcut (or using the default option+cmd+R) gives you another way of running through your resolution presets.
How often do you use external displays and custom screen resolutions in your workflow? What’s your approach? Let us know in the comments section below the article!

Mac OS X 10.9 Development Under Way, Regularly Appearing in Analytics Logs

Mac OS X 10.9 appearing in 9to5mac  web logs
Development of the next major release of Mac OS X is well under way, with version OS X 10.9 regularly appearing in web analytics logs of OSXDaily, 9to5mac, AppleInsider, CultofMac, and several other Apple-related websites. This was first brought to light today by 9to5mac, whose graph above shows a handful of visitors from Cupertino California running a new, unreleased version of Mac OS, labeled as “Intel 10.9″. Cupertino is the location of Apple’s corporate campus.
For OSXDaily, the first appearance of OS X 10.9 came in logs from July 2012, around the launch of OS X 10.8 Mountain Lion. As the graph below demonstrates, there has been a consistent upward trend appearing in our logs as more and more (presumed) Apple engineers use and work on the internal build of OS X.
Monthly ramp up of OS X 10.9 usage on the web
There is open speculation as to what the next version of OS X will be called, and whether or not Apple will stick with the cat named theme. The number of familiar feline names is running thin, and though it’s unlikely Apple would choose an unfamiliar cat name for 10.9, a name like OS X Andean Mountain Cat or OS X Iberian Lynx could certainly surprise us all.